Thursday, June 22, 2017

Annoyed With Peanut Allergies? I Hear You.


I've thought about this for a long time... and I feel as though the peanut and nut-free rules in schools is getting a bad rap. Mostly because people are feeling it's "unfair". I get it. I understand. But as a parent to a child with a severe peanut and nut allergy, let me share with you a different perspective.

Natalie was born in May of 2006 and at the time it was recommended that you do not introduce peanut products to your kids until age 2 in fear of allergic reaction. As a first time mom, I was a "rule follower" and did everything by the book. I ate well during my pregnancy, took my prenatal vitamins, read books, bought products that were doctor recoomended, etc. I read books and did everything I thought was right. We DO NOT have a family history of peanut and nut allergies or asthma. Never would I have thought I'd have a child with both peanut/ nut allergies and asthma. Poor kiddo got the short end of the stick.

Natalie was just 2 1/2 years old when we discovered she had a peanut/ nut allergy, and how we happened to find out she had an allergy was a "best case scenario". I say that because she was with her grandma who also happens to be a nurse. While helping Grandma roll out dough for peanut butter cookies, Natalie broke out in hives, began to swell, and the areas the dough came into contact with were most inflamed. (Note, she never actually ate the dough- just rolled it out). Grandma immediately called me, gave her Benadryl and got her in the bathtub to wash the areas. After getting her out of the tub, and allowing the Benadryl to do it's thing, the swelling and hives had greatly reduced; however, we still went to the ER.

Though the emergency room doctor could not confirm her allergy, he told us it was safe to say she probably was allergic and that we needed to avoid peanuts and nuts until he was old enough to do allergy testing to confirm. An epinephrin pen was prescribed and our "journey" began.
Over the next couple years we closely monitored Natalie's health and struggled at times as she was also diagnosed with asthma. Having both asthma and a peanut/ nut allergy increases the severity of the reaction greatly. When Natalie was old enough, we began allergy testing in LaCrosse, Wisconsin. Check out their site for more information https://lacrosseallergy.com
Through a series of allergy tests, we learned Natalie has many allergies, not just peanuts and nuts. Trees, dust, mold, cats, dogs.... With that, we decided to do immunotherapy which basically is a very small amount of the allergy(s) delivered in a liquid drop form under the tongue three times a day for a few years. To make a long story short, we were very happy with our decision to do allergy drops with Natalie. Though these drops are not cheap and are not covered by health insurance, we did see results! From Natalie's first exposure to peanuts and nuts compared to the ones she has had since, the severity of the reaction has been greatly reduced! Natalie may not ever be 100% allergy free, but as parents we both feel that doing immunotherapy has given Natalie a much needed immune boost.

When I was in school you never heard of people having peanut and nut allergies. It's becoming "common" anymore and something almost every school has to deal with. When it comes to school's needing to be peanut and nut free I have a flood of emotions.

Usually when people "rant" about how schools have to be peanut/nut free, I just let them talk... let them vent their frustrations... all while I quietly sit and listen. "It's not fair that I can't send my son's favorite sandwich to school with him!" "How come schools allow pop and candy bars? My kid has diabetes and he can't eat that stuff... are they going to ban that too?" "It's not the school responsibility to make things peanut free." "Why should we change everything for just one kid?" I usually let them voice their opinions and frustrations, and when they're done, I bolding say "My kid has a peanut and nut allergy and I get it. I know how you feel. I understand where you're coming from."

...I know that my kid's allergies affect your kid. I know that my kid's allergies prevents you from sending a peanut butter and jelly sandwich with your kid to school. I know that my kid's allergies prevent you from sending homemade goodies to school. I know that my kid's allergies means you have to buy prepackaged items. I know that my kid's allergies causes inconveniences. I know that my kid's allergies mean you have to read labels on food before sending it to school. I know that my kid's allergies makes you uncomfortable and prevents you from inviting her to parties. I know that my kid's allergies impacts your child and your household to an extent and it just seems unfair. I know. I KNOW!

And guess what? I don't like it either. I don't like that my daughter's personal health concerns impact others. I don't like feeling as though others are having to "accommodate" for her. And you know what- Natalie doesn't like the feeling either. I don't like that parents can't send an inexpensive, yummy PB & J to school. I don't like many things about Natalie's health concerns, but I also know that we're not alone. I know that there are other allergies (dairy, eggs, strawberries, etc.) in school there are kids with other health concerns that are being met.  My question to you is, have you ever thought about it from our perspective? That the person with the allergies and the family also do not like it and the impact it has on others. We do not like the inconvenience it causes and the extra hand washing it requires. We don't like anything about it, but we also know that their lives depends on it.

We live in a world that is very much focused on ourselves. Our main concerns are our own needs, rather than others. We live in a world where it's easier to complain about something than to be a part of the solution. We're all guilty on some level, myself included. And this my friends, is part of the problem. Rather than focusing on how it inconveniences you to have to send a ham sandwich instead of peanut butter sandwich to school, try putting yourself in their shoes. How do you think they feel?

This applies to all situations, not just those with peanut/ nut allergies. How about the kid who has to be excluded from activities because he has epilepsy and could possibly have a seizure? What about the kid who is autistic? The kid who is in a wheelchair? The kid who is hearing impaired? Do you think any of those kids would choose to have these "problems"? No. Absolutely not. Stop and put yourself in their shoes and please know that these kids do not want your sympathy. They do not want to cause you inconveniences. They do not want to be excluded or labeled as "different" because of their health needs. They want to be "normal".  They want to be healthy. Just like everyone else. This was not a choice for them. Living with health issues is not easy and yes, it does impact others at times... we know.

Now, I must say we are very fortunate that we have family and friends that are very understanding and aware of Natalie's needs. Just because she has a peanut/nut allergy does not mean you have to throw out all the peanut products in your house in order to have her come over. It does not mean you have to exclude her or make her feel different. It does not mean you cannot eat peanut products yourself. It does however mean you have to be aware and careful. 

Brian (Natalie's dad) loves peanut butter and eats peanut butter and jelly sandwiches all the time. We have peanut butter, peanut and nut products in the house and Natalie is still alive!! If we eat things that contain peanuts/ nuts we simply clean the area where it was prepared and wash our hands when we're done eating. Pretty simple. We also check labels and make sure she is not served anything containing those ingredients.

School will be starting up again before you know it and the letter from the school nurse will be coming home I'm sure. As you read through the list of "allowed treats" please, please, please know that I understand how you feel. I'm not naive. I get it. I know it can be frustrating. I know it can seem unfair. I know, I know, I know... But please also know that we want the same thing you want... what's best for our kid.


Thursday, March 23, 2017

The BEST Stir-Fry


Stir-fry is another one of my family's favorites. I found this recipe in a Better Homes & Garden cookbook (my favorite) and tweaked it some to work for us (I double parts of it, left some things out, and added others!) This is one meal you can feel okay about getting seconds. If you're worried about sodium intake, make sure you use a low-sodium soy sauce!

For this recipe you can use either chicken or shrimp. I have made it both ways and it's delicious! The original recipe called for shrimp, so that's how I originally made it, but I switched it up with chicken and it was a hit! (Using chicken is also a money saver!)


To get started, prep your vegetables and put in a large bowl. (The recipe calls for specific amounts, but I no longer measure- I just add however much I want. For example, I'm the only one who likes the carrots so I don't add tons, but add extra broccoli and onions and even chicken!) Once vegetables are prepped, set aside.

If using shrimp, make sure shrimp are peeled/deveined, thawed, and drained. Pat dry with a paper towel and set aside.


If using chicken, cut chicken breast into 1" cubes and put onto a greased cookie sheet and bake at 375* until done (approximately 15-20 minutes).

While chicken is cooking, heat oil in a large skillet and add garlic. Simmer for about 15 seconds and add vegetables. Cook until vegetables are tender-crisp.  **Do NOT over-cook the vegetables!!**


While vegetables are cooking, prepare your soy sauce reduction. Mix your ingredients and have them ready to go!

Next you will scoop your vegetables from the skillet with a slotted spoon and set aside (I put them back into the large bowl I used for prepping). In the skillet you are going to make a soy sauce reduction. Make sure you're stirring the entire time so it doesn't burn! When it thickens and is bubbly, it's ready to go!

Soy sauce reduction cooking, chicken and vegetables ready to go!


Add your cooked chicken or prepared shrimp to the soy sauce reduction. Cook until chicken well heated or until shrimp is opaque (approx. 5 minutes). Add your vegetables at this time and continue to cook until vegetables are soft but still have a "bite" and everything is throughly heated.

While the stir-fry is getting a final heating, go ahead and make up some white rice. That's it! Once you get started making this meal, it goes quickly! Enjoy!

Dinner is served!


The BEST Chicken/ Shrimp Stir-Fry

1 pound fresh or frozen medium shrimp  -OR-
3-4 chicken breasts, cut into 1" cubes (baked)

2 C broccoli florets
1 medium/large onion, halved lengthwise and sliced thin
1 C thinly sliced carrots
(optional: 1 C fresh mushrooms)

2 T cooking oil
2 cloves garlic, pressed/minced

Soy sauce reduction:
2/3 C water
1/2 C soy sauce
4 T vinegar
2 T cornstarch
1 T sugar

4 C Cooked white rice

1) Thaw shrimp, if frozen. Peel, and devein. Pat dry on paper towels. Set aside. If using chicken, cut into 1" cubes and put onto a greased cookie sheet and bake at 375* until done (approximately 15-20 minutes). Set cooked chicken aside.

2) Mix together: water, soy sauce, vinegar, cornstarch, and sugar. Set aside.

3) Heat oil in large skillet (add more if necessary during cooking). Cook and stir garlic in oil for about 15 seconds and add broccoli, carrots, and onions. Cook and stir until vegetables are tender-crisp. Remove vegetables from the skillet with a slotted spoon.

4) Sitr soy sauce mixture. Add to skilet; cook until slightly thickened and bubbly. Add shrimp or chicken at this time for about 3 minutes, making sure shrimp is opaque and well cooked. Stir in vegetables; heat through. Serve with rice. **Optional: sprinkle with toasted cashews**


Tuesday, February 21, 2017

What's for Dinner??

I love cooking for my family but honestly hate coming up with ideas as to what to make? I feel like we always eat the same things and when I ask for suggestions I get the famous "I don't care", "whatever" or "food". Then when you make "I don't care, whatever or food" everyone whines and says, "But I didn't want this! I don't like this."  *Palm slaps forehead* Sound familiar?! I bet everyone can relate at some level.

I finally decided to start planning out meals, and I'm so glad I did!! I literally have saved time and money by doing so.... I plan out my family's meals for two weeks at a time. This can be done on a weekly basis if preferred. Honestly, it takes me about 15 minutes to make my list of meals and grocery list to match. It's simple and so worth it!!

By planning out my family's meals, I have found that:

*I don't waste time asking "what do you want for dinner"- it's planned and there's no discussion about it. I can look ahead at my list and tell you what we're having for the next two weeks! I feel organized and prepared... and I like that!
*By knowing what I am making in advance, I'm able to plan what meat to have thawing in the fridge and can have ingredients on hand and ready to go. (Certain veggies prepped, items mixed in advance, and so on).
*When grocery shopping, I look at the meals I've planned and make sure I have all the ingredients on my shopping list. When shopping, I stick to my list. By sticking to my list and only buying the ingredients needed to make my meals, I avoid over-buying and impulse buys. (The only time I veer from my list is when I find a good deal and need to stock up on that particular item).
*And lastly...we aren't eating the same thing all the time. We have variety and change and it's a good thing!

So, I only plan one meal a day, five days a week. Five meals a week. Easy. Anyone can do it! I only plan one meal a day, five days a week because my kids are in school during the day. Also, I have one day planned for eating left overs, and another day I cheat with something simple like frozen pizza, packaged chicken nuggets, hamburger helper, sandwiches, or soup (cereal anyone?!). And of course, there's always the occasional eating out. (We don't eat out very often. My husband is required to eat out for his job, so he doesn't particularly care to do it when he can have a home-cooked meal. Eating out for me and the kids a treat though!)

Another thing I try to do is plan one "meat-less" night. My husband could eat meat everyday for every meal; however, I'm not a big meat eater. By planning one night without meat helps keep everyone happy and also save a little money. I also try to make sure I have a mix of chicken and beef meals in a week. Nobody wants to eat chicken five nights a week! Switch it up! On nights that I know we are going to be really busy and not have a lot of down time, I plan crackpot meals for those nights. Plan ahead- look at your schedule and pick a meal that will work for you and your busy schedule. My crockpot is my best (kitchen) friend!

One other thing I'm particular about is making sure my kids are offered a "well rounded meal". I always have at least one fruit and one vegetable available and some sort of side dish to go with. If I'm serving a large main dish, like lasagna for example, I won't make a side dish. When making a large 'main dish', I just include a fruit and vegetable and maybe some breadsticks. Do what works for you and your family though, but think about side dished and fruits/vegetables when grocery shopping and planning meals.

Searching Pinterest of flipping through cookbooks is a great way to get ideas. Maybe one night a week you will try a new recipe? Who knows, maybe one of those new recipes will become a new family favorite?! If you have several family recipes that everyone loves, make sure to get them on your list! Once you have a good size list and have made all the recipes, you can start the list all over again! No more eating the same thing all the time!

If you're willing to put a little time and planning into your family meals, you can save lots!! Not just time, but money. It feels so good to know I have dinner planned out and I won't have to stress out about what to make at 5:00. My kids also like knowing in advance what they will be having for dinner. My daughter suggested I print up a menu like they get for school lunches. I think I will pass on this idea however because I don't want them getting the idea that they can have "cold lunch" instead of what's being served. Sorry, this isn't a restaurant (or school). You eat what Mom makes and that's that!

Below I have complied a list of meal ideas. If you plan one meal for five days a week, the below list is enough to last you well over a month! Score!! Share your meal ideas with me, I'd love to hear them!

What For Dinner- Meal Ideas:
Goulash
Scalloped potatoes and ham
Homemade hamburger soup
Homemade chicken noodle soup
Chili
Maid Rites/ sloppy joes
Chicken drumsticks (crockpot)
Burritos
Grilled chicken with vegetables on the grill
Grilled cheese sandwiches & tomato soup
Tacos
Hamburgers
Hot dogs/brats
Spaghetti
Chicken or shrimp stir-fry
Homemade shells and cheese with peas
Homemade pizza (*See blog for recipe!)
Breakfast dinner: French toast or pancakes, eggs & bacon
Easy pot roast/ steak (*See blog for recipe!)
Chicken casserole
Meatloaf
Sweet and sour chicken with fried rice (*See blog for recipe!)
Chicken patties on a bun
Chicken and noodles
Chicken enchiladas
Lasagna (made in pan or crockpot)
Homemade chicken strips
Steak
Smoked ribs
Omelets, bacon, and cinnamon rolls/toast
Beef taco skillet/ taco bake
Beef stroganoff
Pot roast with vegetables
BBQ beef sandwiches (left over meat from roast)
Hot beef/ pork sandwiches with gravy over mashed potatoes (can use left over meat from roast)
Baked spaghetti
Manicotti
Tater tot casserole
Pork chops (crockpot)
Bubble pizza
Creamed chicken over biscuits
Chicken and rice casserole
Bacon wrapped chicken


Friday, January 13, 2017

DIY Art Desk


I see potential!! And for $30 it's perfect! 

This was a fun project! I had a vision from the beginning and I think it turned out perfectly!

Natalie is an art lover and collects all sorts of art supplies. She was quickly running out of space for all her markers, pencils and supplies. When I spotted this small desk on a Facebook for sale page, I snagged it up. It's small size is perfect- it's only 32" long and works well in the space. And to make the sale even sweeter, they threw in a matching chair that needed some TLC. With a little wood glue, nails, and a fresh coat of paint, it was back in business and better than before!


Thankfully for the rest of the project I had enough scrap wood and supplies that I didn't have to go purchase anything- including the paint! The paint I had left over from painting Natalie's bedroom.

For the back of the desk, I cut a piece of plywood to the length of the desk, 32 inches, and made it approximately 26 inches tall. I cut a shelf that measured 32" long by approximately 5.5" wide. The smaller of the two shelves was a last minute add on and I just eyeballed it and didn't even measure it!

I painted three mason jars the same pretty mint green color ('Scottish Glenn') as the chair and used dryer vent fasteners to secure them to the back. (I spray painted the fasteners gold). I secured three gold mug hooks into the bottom side of the small shelf so scissors or other supplies could be hung. A painted clothes pin was nailed to the board to allow pictures and other items to be hung!

I used the mint green color to add accent to the shelf and desk edges, knobs on the drawers, as well as the insides of the drawers.

I built a drawer organizer out of some more scrap wood and topped it off with some gold paint.

On the left side of the desk, I attached a Melissa & Doug paper roll/dispensor and cutter that Natalie got for Christmas. It literally was the perfect size and is a great addition to her art desk!

Paper dispenser & cutter!
All filled up! 
She LOVES her new desk and I can already see many hours of creativity pouring from it! I'm proud of how it turned out and look forward to another creative project!

Do you have any fun projects lined up or ideas for repurposing items?

Sunday, January 1, 2017

Picky Boy's Version of "Steak"

I have a 7 year old that is pretty picky when it comes to what he eats. If it's not steak, chips, popcorn, or hot cocoa, it's a struggle to get him to eat sometimes. I came across a version of this on Pinterest awhile back and have since adapted it to work for our family. I have experimented using different meat and vegetables, and every time it seems to be an easy pleaser at our house.  This is a far cry from steak, but that's what the boy has dubbed it! Though it's not steak, it's delicious, easy, and enjoyed- for those reasons, it's a keeper! :)

The nice thing about this recipe is that it take minimal planning and prepping, it's filling, and you can feel good about serving this over take-out/fast food.

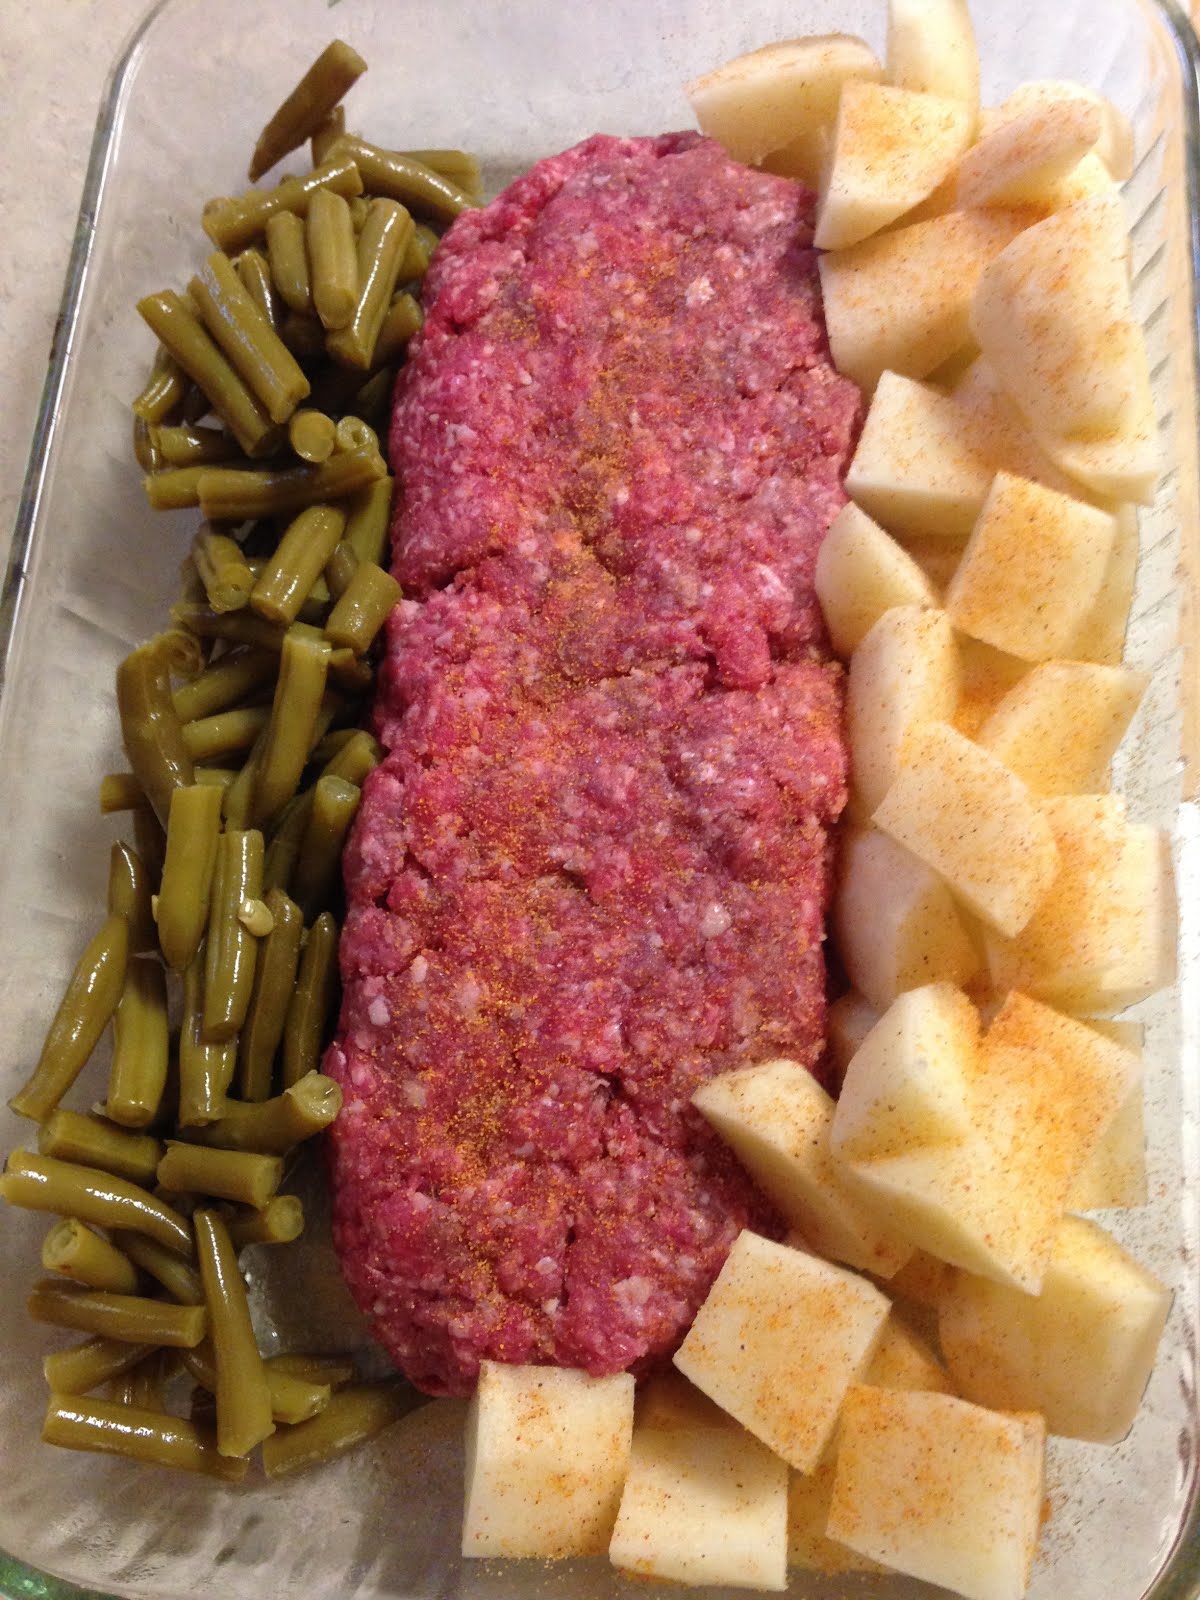
In a 9x13" greased dish, put 1-2 pounds of ground beef down the middle (can use 3-4 chicken breast). On one side of the meat, place 3-4 potatoes that have been peeled and cubed. On the other side of the meat, place one can of green beans (can use fresh green beans &/or carrots). I typically will add a handful of baby carrots to the dish... I'm the only one who will eat them, so I don't go overboard with them ;)

Once you have meat, potatoes, and vegetable of choice in the dish, lightly season with salt and pepper or seasoning salt (I use Lawry's). Then thinly slice some onions (as much as you prefer) and place over the meat and potatoes. Cut 2-3 tablespoons of butter into small cubes and place over the entire dish.

Cover the pan with aluminum foil and bake at 375*  for approximately 1 hour, or until the meat is done and potatoes are soft.


Picky Boy's Version of "Steak":

1-2 lb. ground beef OR 3-4 boneless, skinless chicken breasts
3-4 potatoes- peeled and cubed
1 can of green beans OR fresh green beans
Fresh carrots (baby carrots save you prep work!)
Onion
2-3 T. butter, cubed into small pieces
Put into a greased 9x13" dish and cover with foil. Bake at 375* for approximately 1 hour.

Enjoy!


Thursday, December 22, 2016

The BEST and EASIEST Homemade Salsa Ever!

When it comes to salsa, my husband is pretty picky. We have yet to find a store-bought salsa that has met his standards. By that I mean, a salsa that has good flavor and isn't chunky. He doesn't like chunks of tomatoes, peppers, or onions in his salsa which makes this easy homemade restaurant-style salsa perfect! I love how quick and easy it is to make and the fact that you have control over how thick and how spicy you want it. Once you make this salsa, your days of buying salsa in the grocery stores will be over! 

It is da bomb!

To make this salsa you will need a blender or food processor.  I use my Ninja and it works great. 

Jalapeno seeds adds heat to your salsa!
More seeds= hotter salsa!
In your blender/food processor add the following ingredients:

1- 14 oz. can of diced tomatoes
1 10 oz. can of original Rotel
1/2 of a small onion, roughly chopped
1 clove garlic, peeled & smashed
1/2- 1 jalapeno, seeded or not (Seeds will make your salsa hot! More seeds= more heat!)
1 tsp. honey
1/2 tsp. salt
1/4 tsp. ground cumin
Small-medium handful cilantro (I add a large handful of cilantro because I LOVE it!)
Juice of 1 lime (or use 1- 1 1/2 tsp. bottled lime juice)

Put all the ingredients in the blender and pulse for 30 seconds. Blend until it's to your desired consistency. Taste and adjust taste if needed by adding more of a particular ingredient. Serve with chips, tacos, burritos and more! Enjoy!!

**This salsa is delicious served right after making! It will make enough to fill two jars. I usually make a double batch and stick the extra in the freezer! Salsa will freeze perfectly fine, but be aware that upon thawing, the salsa will have a thinner consistency. Taste remains the same and just as delicious, just thinner due to the freezing/thawing process. 

Here's what you need! Blend and enjoy! 
I hope you enjoy this salsa as much as we do! 

Homemade Pizza

Hello all!! It's been awhile since I have last posted so today I am hoping to make up for lost time ;)

Today I wanted to share with you my favorite recipe for homemade pizza. Often times I think people get intimidated with having to make pizza dough or feel it takes too much time. The quick solution usually results in either going for a store-bought pre-made pizza crust or the refrigerated kind you can simply roll out. OR for some people, their idea of "homemade" is Pizza Hut! Now, I do love Pizza Hut, but if you haven't given a real homemade pizza a shot, I'd encourage you to do so!
Dissolve active dry yeast in warm water.

To begin, you will want to preheat your oven to 425* and have your toppings ready to go! To start off you will need to dissolve 1 package of active dried yeast in 1 cup warm water. (*NOTE- do not use hot water as this will kill the yeast.) Once the yeast is dissolved, stir in 1 teaspoon sugar, 1 teaspoon salt, 2 tablespoons of vegetable oil, and 2 1/2 cups flour.

Knead the dough on a floured surface.


Mixing these ingredients will take some stirring in the bowl but in order to really mix well, flip the dough out on a floured surface. Knead the dough until smooth and elastic, adding flour if necessary so it doesn't stick. Once the dough is well kneaded, flip the bowl over the dough and allow it to 'rest' for approximately 5-8 minutes.

Allow the dough to rest for 5-8 minutes.
Once the dough has rested, roll out on a lightly greased pan. I used a Pampered Chef round stone. This recipe makes enough to make two small pizzas (thin crust) or one large pizza (thicker crust). Top the dough with pizza sauce and your favorite toppings. **A favorite of ours is hamburger and pepperoni!!** Finish off with a generous layer of cheese and bake at 425* for 15-20 minutes.


Make your own pizza sauce using pizza seasoning
with your favorite pasta sauce! 
**Don't have pizza sauce? No problem!! I stopped buying pizza sauce because I have found a dual purpose for plain ol' pasta sauce! Score! To make pizza sauce, simple use your favorite pasta sauce on your pizza and then sprinkle with pizza seasoning. (found in the spice aisle and costs less than a $1.00) Pizza seasoning will give your sauce the flavor and spices that traditional pizza sauce would have.)


The total amount of time invested in making a homemade pizza is about 35-40 minutes... and that's time to allow the dough to rest and baking time! If you have your topping ready to go, the process of making and baking a homemade pizza is pretty simple! Enjoy :)


Homemade Pizza Dough:

1 package active dry yeast
1 C. warm water
1 tsp. sugar
1 tsp. salt
2 T. vegetable oil
2 1/2 C. flour

Dissolve yeast in warm water. Stir in remaining ingredients, mix well and knead on a flour surface. Let dough rest for approximately 5-8 minutes. Spread dough over greased pan, top with pizza sauce and toppings of choice. Bake at 425* for 15-20 minutes.