Thursday, December 22, 2016

The BEST and EASIEST Homemade Salsa Ever!

When it comes to salsa, my husband is pretty picky. We have yet to find a store-bought salsa that has met his standards. By that I mean, a salsa that has good flavor and isn't chunky. He doesn't like chunks of tomatoes, peppers, or onions in his salsa which makes this easy homemade restaurant-style salsa perfect! I love how quick and easy it is to make and the fact that you have control over how thick and how spicy you want it. Once you make this salsa, your days of buying salsa in the grocery stores will be over! 

It is da bomb!

To make this salsa you will need a blender or food processor.  I use my Ninja and it works great. 

Jalapeno seeds adds heat to your salsa!
More seeds= hotter salsa!
In your blender/food processor add the following ingredients:

1- 14 oz. can of diced tomatoes
1 10 oz. can of original Rotel
1/2 of a small onion, roughly chopped
1 clove garlic, peeled & smashed
1/2- 1 jalapeno, seeded or not (Seeds will make your salsa hot! More seeds= more heat!)
1 tsp. honey
1/2 tsp. salt
1/4 tsp. ground cumin
Small-medium handful cilantro (I add a large handful of cilantro because I LOVE it!)
Juice of 1 lime (or use 1- 1 1/2 tsp. bottled lime juice)

Put all the ingredients in the blender and pulse for 30 seconds. Blend until it's to your desired consistency. Taste and adjust taste if needed by adding more of a particular ingredient. Serve with chips, tacos, burritos and more! Enjoy!!

**This salsa is delicious served right after making! It will make enough to fill two jars. I usually make a double batch and stick the extra in the freezer! Salsa will freeze perfectly fine, but be aware that upon thawing, the salsa will have a thinner consistency. Taste remains the same and just as delicious, just thinner due to the freezing/thawing process. 

Here's what you need! Blend and enjoy! 
I hope you enjoy this salsa as much as we do! 

Homemade Pizza

Hello all!! It's been awhile since I have last posted so today I am hoping to make up for lost time ;)

Today I wanted to share with you my favorite recipe for homemade pizza. Often times I think people get intimidated with having to make pizza dough or feel it takes too much time. The quick solution usually results in either going for a store-bought pre-made pizza crust or the refrigerated kind you can simply roll out. OR for some people, their idea of "homemade" is Pizza Hut! Now, I do love Pizza Hut, but if you haven't given a real homemade pizza a shot, I'd encourage you to do so!
Dissolve active dry yeast in warm water.

To begin, you will want to preheat your oven to 425* and have your toppings ready to go! To start off you will need to dissolve 1 package of active dried yeast in 1 cup warm water. (*NOTE- do not use hot water as this will kill the yeast.) Once the yeast is dissolved, stir in 1 teaspoon sugar, 1 teaspoon salt, 2 tablespoons of vegetable oil, and 2 1/2 cups flour.

Knead the dough on a floured surface.


Mixing these ingredients will take some stirring in the bowl but in order to really mix well, flip the dough out on a floured surface. Knead the dough until smooth and elastic, adding flour if necessary so it doesn't stick. Once the dough is well kneaded, flip the bowl over the dough and allow it to 'rest' for approximately 5-8 minutes.

Allow the dough to rest for 5-8 minutes.
Once the dough has rested, roll out on a lightly greased pan. I used a Pampered Chef round stone. This recipe makes enough to make two small pizzas (thin crust) or one large pizza (thicker crust). Top the dough with pizza sauce and your favorite toppings. **A favorite of ours is hamburger and pepperoni!!** Finish off with a generous layer of cheese and bake at 425* for 15-20 minutes.


Make your own pizza sauce using pizza seasoning
with your favorite pasta sauce! 
**Don't have pizza sauce? No problem!! I stopped buying pizza sauce because I have found a dual purpose for plain ol' pasta sauce! Score! To make pizza sauce, simple use your favorite pasta sauce on your pizza and then sprinkle with pizza seasoning. (found in the spice aisle and costs less than a $1.00) Pizza seasoning will give your sauce the flavor and spices that traditional pizza sauce would have.)


The total amount of time invested in making a homemade pizza is about 35-40 minutes... and that's time to allow the dough to rest and baking time! If you have your topping ready to go, the process of making and baking a homemade pizza is pretty simple! Enjoy :)


Homemade Pizza Dough:

1 package active dry yeast
1 C. warm water
1 tsp. sugar
1 tsp. salt
2 T. vegetable oil
2 1/2 C. flour

Dissolve yeast in warm water. Stir in remaining ingredients, mix well and knead on a flour surface. Let dough rest for approximately 5-8 minutes. Spread dough over greased pan, top with pizza sauce and toppings of choice. Bake at 425* for 15-20 minutes.

Sunday, October 9, 2016

Freezing Vegetables


This is just one of my freezers and it gives me a small sense of pride when I realize all the time I put into packing it full. Not to mention all the money I saved! I love being able to open the freezer door and know that I prepared all this food and saved our family lots of money in the process. PLUS- it all tastes better than the stuff off the store shelves. This freezer is packed full of items I have prepared and froze. Homemade jam,  homemade salsa, fresh green beans, sweet corn, cut and prepared chicken breasts, hamburger (93% lean, purchased on sale and packaged into individual bags), fresh broccoli, homemade applesauce, fish, rhubarb, and more!

A good follow up to last week's post, freezing fruit, I thought would be how to freeze vegetables. Freezing veggies is a little different in that you have to blanch (partially cook) the vegetable before freezing. The most common vegetable I freeze is green beans. We love fresh green beans and by freezing them, we can enjoy them year round. As stated in the previous blog post, I keep an eye out for when green beans go on sale ($0.99/pound or less) and stock up!


I was able to grab some broccoli on sale earlier in the week ($0.99 per bundle). There was no way we'd eat it all before it went bad, so I decided to freeze it and have it handy for later use.


Just as you would with fruit, make sure your produce is well washed before moving forward. (I use an organic fruit wash found in the produce section at the grocery store).

Once your vegetables are washed, you can begin cutting and preparing it. For broccoli, cut the broccoli florets and stems (I personally don't are for the stem part of broccoli, so I don't prepare it. If you do, cut and prepare it as you normally would). If you're doing green beans, cut the ends off the beans.

In a large stock pot, bring water to a boil. Put cut broccoli (green beans) in the water and cook for 3 minutes. While the broccoli is cooking, cover a cookie sheet with a flour sack towel and fill a large bowl with cold water and add ice cubes.

When the vegetables have cooked for 3 minutes, put immediately into the ice bath.  This will stop the cooking process. Allow the broccoli to completely cool in the ice bath and then lay in a single layer on the towel-lined cookie sheet.


Once the broccoli (vegetables) have dried, you can go about the next step one of two ways:
1) Line a cookie sheet with freezer paper and freeze the vegetables in a single layer. Once the vegetables are completely frozen, bag the vegetables.
OR
2) Put into a freezer bag in a single layer and freeze.

**(When I freeze green beans, I will put my desired amount right into the bag and freeze. I don't worry about freezing in a single layer or freezing before bagging simply because when I go to cook them, I use the entire bag.  My bag was froze with my desired amount and I don't have to worry about breaking them apart for separate uses. I use the entire bag of green beans when I pull them out of the freezer, therefore, freezing in a single layer is not important. This can be done for any vegetable, if you know you will use the entire bag when you take it from the freezer, you can skip the freezing in a single layer/freezer paper. Does that make sense?!)

Okay- once the vegetables are frozen/ bagged, make sure you label them and you're done! This process can go fairly quickly and when you look at the grand scheme of things- it's saving you so much money! Plus, as I said before, it tastes so much better than the stuff you get off the shelves in the store.

Freezing vegetables and fruits is a great way to preserve the flavors of summer and enjoy them all year. Just like freezing sweet corn- it's something you get once a year but not limited to eating it just in the summer. I hope you are able to use this insight and try it yourself. Looking for sales, stocking up, preparing good quality food, and saving money is something I can get behind and feel good about!


Sunday, October 2, 2016

Leftover Pasta? No Problem!


<--This picture seems pretty accurate, don't you think? When planning to make spaghetti, I feel it's usually a guess as to how much to make. Also, what is considered "one serving"? And what the heck do I do with the 10 pounds of left over spaghetti I just made? Sound familiar? Trust me, you're not alone. Leftover spaghetti can sit in your fridge for a long time... unless you know this little trick to make your left overs disappear!
Leftover spaghetti? Great!
You got another meal coming!


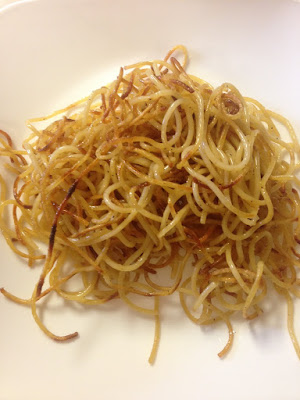
I probably can't dub it as a "trick" because the reality is, all I do with my left over pasta is fry it. Yup- super healthy I know, but it does the job.

My mom always made us "crunchy noodles" as kids because her mother use to make it for her. Frying up left over spaghetti (or any pasta) for my Grandma was simply a way to prevent food from going to waste... and it worked!

Whenever I cook pasta, I always purposely add extra just so I can make a batch of crunch noodles later on in the week for the kids. In fact, I'm matching a batch a goulash right now and cooked way more macaroni noodles than I will need just so I will have leftovers. The kids love it and it's easy to prepare.

Grab a pen and paper... are you ready?
In a frying pan, add a couple tablespoons of butter and allow it to melt. Throw in your cold, leftover pasta, and add salt and pepper to taste. Toss pasta noodles so they are coated with butter. Allow the noodles to cook, stirring and flipping once in awhile until noodles are golden brown.

.... and you're done. That's it. Super easy. My kids like eating them plain, just as they are shown in the picture! I'll admit that when I make this for the kids, I feel like I'm cheating and taking the easy way out. And I am. But I'm totally okay with that. If they like it and will eat it, it's a win-win.

Dig through your fridge right now. Do you have leftover pasta? If so, give it a shot! If you cook up a batch of "crunchy noodles" I'd love to hear what your kids think of it! Share your (or your kids') thoughts in the comments below :)


Have a wonderful week!

Bam! Dinner is served!

Sunday, September 25, 2016

Freezing Fruits


I love buying fruits and vegetables on sale. Buying produce on sale can be a huge money saver! If you know how to properly preserve your food, it will go a long way. Not to mention it tastes better, is fresher, doesn't have preservatives or added juices, and looks way better than the canned stuff. I freeze whenever I have the chance. The thing about freezing verses canning however, is that frozen food can go bad with frostbite if not used in time. Be sure that you only freeze enough to use- don't over buy and freeze and then allow it to go to waste. If you freeze regularly, you will want to make sure you are rotating your stock and labeling foods with a date to ensure freshness!

One of my favorite things to freeze is green beans. I usually keep my eye out for sale- I will only buy green bean when they are less than $1.00/pound. In the summer you can usually find fresh garden green beans at a good price, unless you are able to grow them yourself!  Fresh green beans are so much better than canned beans. I can't wait to share with you how to freeze green beans. In order to properly freeze green beans (or any other vegetable) there are a few more steps involved, unlike fruit... I will save that for another blog post!
Floursack towels can be purchased at Walmart,
Target, etc. or my personal favorite- Amazon!

Freezing fruit is pretty simple as you don't have to worry about blanching it (pre-cooking it) like you would vegetables. First and foremost, it's important to wash your produce. I use an organic fruit wash that can be found in your local grocery stores, otherwise I know Norwex has a good fruit wash. Soak, wash, rinse and allow to dry on a clean flour sack towel. **Side note: I love using floursack towels in my kitchen. They are great for drying dishes, cleanup, and just about anything else! They dry quickly, are lightweight, great to covering dough when baking. Also, floursack towels won't leave little bits of lint behind on your dishes, or in this case, fruit.**


Once your fruit has been washed, line a cookie sheet with parchment paper and lay your dried berries in a single layer on the lined sheet. Make sure the berries are not piled on top of each other!


Pop the fruit in the freeze for about 3 hours (or until frozen solid). Once the berries are frozen solid, put them into a labeled bag. That's it!!

**The key here is freezing them prior to bagging AND freezing them in a single layer on the cookie sheet. Often times you will see people bag fruit by simply throwing it in a bag and popping it into the freezer. The end result- a large frozen clump of fruit that will need to be chipped away at or broken apart when you go to use it. By freezing them in a single layer prior to bagging, you avoid one large frozen fruit pile in a bag. The berries will not be frozen together and will make measuring and preparation of the fruit so much easier when you take it out of the freezer! It's a simple trick but is the best way to freeze produce!

I hope you found this little tidbit helpful! I will share how to properly freeze vegetable in a future post. Thanks for stopping by and checking things out! :)

These blueberries have already been frozen in a single layer on a cookie sheet then bagged!
The berries are not frozen together and measuring is a synch! 


Wednesday, September 14, 2016

Cheeseburger Soup

With the weather in Iowa slowing cooling down and the leaves on the trees starting to fall, it's putting me in the mood for all things fall. With that, comes soup. There's nothing better on a cool autumn day than to come home, put on your comfy clothes, kick back, and enjoy a nice bowl of homemade soup. Ahhhh... I can smell it already! It's SOUP SEASON!

Cheeseburger soup is another favorite in our house. My daughter specifically requested that we have this soup for Christmas dinner! She proceeded to tell me how much it makes her think of cold winter nights, family, cozy evenings together, and Christmas time. Wow. All those emotions and memories being evoked from a bowl of soup. It must be pretty good then!

One of the great things I really like about this soup, besides the fact that it's delicious, is that it's supper easy! If you're looking to cut down prep-time before dinner, many (pretty much all) of the ingredients can be prepared the night before making meal time a synch!

To begin, you will need 3 cups of chicken broth in a small stock pot. I prefer to make my own broth by using chicken bouillon verses purchasing canned broth. I personally feel that by using chicken bouillon you get more flavor AND it's much cheaper and cost effective over the long run. I don't recall ever buying chicken broth- I have always made it using bouillon.
Cubed potatoes, chopped onions & carrots in broth.

In the chicken broth, you will add 4 cups of peeled and cubed potatoes (bite size). Add chopped onions and carrots. **The recipe calls for chopped celery, but I choose to omit this ingredient** (these ingredients could easily be prepared in advance)

Bring the broth/veggies to a boil, cooking until the vegetables are tender and the potatoes are easily poked with a fork. Next, brown 1 pound of ground beef. Drain off the fat. (Ground beef can also be prepared in advance)

Brown ground beef.
Cubing cheese is a great job for little ones!


While the beef is browning, cube 8 oz. of Velveeta cheese. This is a great job for little helpers in the kitchen!! (Again, cheese can be prepared the night before!)

Add 1 cup sour cream.

Once the potatoes and vegetables are tender, add the ground beef, cheese, and 1 cup of sour cream to the mix. Simmer and stir until heated through and the cheese is completely melted.
Salt & pepper to taste.


That's it! Super simple and fast! To top it off, add some crumbled bacon if you wish. Enjoy! Yuuuummmmm...


Cheeseburger soup! Crumbled bacon adds extra flavor!


Cheeseburger Soup:


3 cups chicken broth
4 cups peeled & cubed potatoes
1/2 of a small onion, chopped
Chopped carrots - to desired taste (I added one medium carrot)
Chopped celery- to desired taste 
1 pound ground beef- brown and drain
8 oz. Velvet cheese- cubed
1 cup sour cream
Salt & pepper to taste 
Crumbled bacon- optional 

Boil the cubed potatoes and vegetables in the chicken broth until the vegetables are tender and the potatoes are easily poked with a fork. Brown ground beef, drain. Cube 8 oz. of cheese. Once the vegetables and potatoes are ready, add the meat, cheese, and 1 cup sour cream. Simmer until heated through and the cheese is completely melted. Add crumbled bacon for additional flavor! Enjoy :) 


Monday, September 12, 2016

Sew Easy!


This project has been on my to-do list forever! I finally made the time to sit down and get my new kitchen curtains whipped up. I'm so glad I can check this off my list.

About 7 years ago I made curtains for the kitchen. I made them because I was not finding what I wanted in the stores (or online) and I refused to pay a small fortune for something that I could easily make. The curtains I envisioned were simple so I knew I could pull it off as soon as I found the perfect fabric.

I swear fabric stores are becoming a thing of the past, but I was lucky to find what I had in my mind at JoAnn's Fabrics. I wanted a "country" look but did not want plaid, lace, or chickens. I found this simple burgundy gingham print and knew it was the one!

Well, seven years have passed and that fabric has become very faded from the sun. It needed a facelift. I adventured back to JoAnn's Fabric and was giddy with delight when I found the exact same fabric I used before. Same color, same print. Score!! And for about $35 I had all the material I needed. If I were to order them through a store, it would have cost me way more than $35!! It was a win-win!

(I'm slightly embarrassed to show you this, but below you can see the drastic difference in the fabrics. You can see how faded the curtains became from the sun)
Can you say faded? Yikes! 

Now, I know many people would say that there's no way they could make curtains. Seriously- if you can sew a straight straightish line, you'll be fine. With a sewing machine, a hot iron, fabric tape measure, and a little knowhow, it can be done. I promise.

This set of curtains was super easy to make since I already had my measurements from the previous set. I simply took off the old curtains, measured, cut, and sewed up the new ones! When making your first set of curtains there will obviously be some measuring and calculations to figure before you cut and sew.

Fold the edges under and press before sewing.

My curtains are literally long rectangles with a rod pocket. Pretty simple. I folded the edges (sides and bottom) of the fabric under and pressed it with an iron before sewing. For the top of the material (where the rod pocket will go) I folded the material under 2.5" and sewed a 1" pocket for the rod to slip through.
Top folded 2.5" to allow room for a rod pocket.


Sewing the edges under!


Making the tiers (panels) and valances uses the same process, the measurements are just different. If you can measure, cut, and operate a simple sewing machine while making a straight stitch, I know you can totally pull off a set of curtains yourself!

Finished product!


A fresh look in the kitchen!
I'm happy with how they turned out!


Sunday, September 4, 2016

I Scream. You Scream. We All Scream for FRIED ICE CREAM!

We spent the afternoon at the Big 4 Fair and of course enjoyed some delicious tastes that only the fair can bring. The tastes and smells of the fair reminded me of this delicious recipe for fried ice cream. It's a favorite of ours and I will occasionally make up a batch to top off the day... super easy and so addictingly good!! Check it out!


To get started, put a baking dish in the freezer for about an hour to chill OR you can use freezer paper and line the dish.


Scoop generous balls of ice cream and place onto the chilled dish (or paper-lined dish). I use vanilla ice cream, but you may use whatever flavor you prefer. Place the dish of scooped ice cream in the freezer until frozen solid.


While the ice cream scoops are freezing, cut the edges off the white bread. You will need two slices of bread per ice cream scoop.


Next, with a rolling pin, flatten the trimmed pieces of bread so they are flat!

Ice cream wrapped in 2 pieces of bread.


Remove the frozen ice cream scoops from the freezer and wrap the ice cream in two pieces of bread (the ice cream should be "sandwiched" between the bread), making sure to cover the ice cream completely. Gently "pack" the pieces of bread around the frozen ice cream. Place back into the dish and freeze for approximately 2 hours or until frozen solid. (I lined my dish with foil to allow easy removal)


Next, mix together cinnamon and sugar in a dish.

Heat oil (enough to halfway cover the ice cream scoops- I would guess about 1.5"- 2" of oil) to 365*. BE CAREFUL!

Very carefully place the bread wrapped ice cream scoops into the hot oil. Cook on each side for about 15 seconds. Remove and place on a plate lined with paper towels.


Allow any excess oil to drip onto the paper towels and then place into the dish with the cinnamon and sugar. Sprinkle & roll the fried ice cream in the cinnamon sugar mixture and eat immediately!

The combination of cold ice cream and the warm fried bread covered in cinnamon sugar is awesome! Enjoy :)


FRIED ICE CREAM


– ice cream, any kind or flavor
– white sandwich bread
– vegetable oil
– 2 teaspoons cinnamon
– ⅓ cup granulated sugar
*Optional: Top with chocolate syrup, whip cream, nuts, etc! 

How To
1)  Place a sheet pan in the freezer and allow to cool for at least 1 hour.
2) Using a large ice scream scoop, form balls of ice cream about 2½ inches in diameter. Place on the frozen sheet pan and return to the freezer until frozen solid.
3) Cut the edges off the slices of sandwich bread and flatten with a rolling pin. (You will need 2 slices for each ice cream ball.) Take the flattened bread and mold around the ice cream balls. Place back in the freezer for about 2 hours, until frozen rock-solid.
4) Mix the cinnamon and sugar together in a bowl large enough to hold and coat one ice-cream-ball at a time. Set aside.
5) In a pot, heat oil until it reaches 365 degrees Fahrenheit. (Be careful!) Dip each ice-cream-bread ball into the hot oil for about 15 seconds, until golden brown on all sides. Remove from the oil, pat dry with a paper towel, and roll in the cinnamon-sugar.
6) Garnish with your favorite toppings and serve immediately.